Happy Monday, especially to Jean Humphries, winner of the Mood Fabrics giveaway
Jean, please confirm your email with me no later than Wednesday, February 22 or a new winner will be selected. Congratulations!
Many thanks to all who participated in the giveaway and again to whomever voted in the African Print Challenge. I thoroughly enjoyed reading your thoughtful and very kind comments and will be responding now that the giveaway is completed.
My next post will feature a beautiful make by my friend and co-author, Julie Starr ( not a tunic!)
Knowing I can sew a garment for a tiny fraction of the retail price of a simply thrills me, and is one of the reasons I continue to sew.
I knew I could make the $200 Saint James Toledo striped dress I saw in a boutique in Charlotte,but I didn’t know that Mood Fabrics stocked Saint James knits ~ the very same fabrics!
Upon finding Burda 6722, I knew it was meant to be.
Described as a ponte, Mood offers the Saint James knits in several colors, and I chose the white background with black stripes.
I rarely sew Burda patterns (no reason in particular) but that needs to change for their fit is always spot on! I made no pattern alterations other than shortening the bodice along the adjustment lines.
Loaded with body and a terrific drape, the fabric works well for a shapely garment and has great recovery.
Stripes are so much fun to work with! I couldn’t end this project without a little play on stripes, and echoed the vertical stripes in the shoulder with a small vertical striped border on the hem.For the 1″ border, I wanted to encase the lower edge and cut a 3″ strip of fabric which was folded in half.
After turning and pressing in 1/2″ on each side, I found the placement line on the outside of the dress and basted in place along the foldline before stitching, and then folding to the inside.
I ultimately decided to finish the border by handstitching rather than topstitching since the only topstitching featured is on the sleeve hem, and is barely visible.
Since I was unable to make a muslin for this dress, all seams were first basted before stitching and finished in the serger.
The pattern would have been an instant gratification project had I not added the border, but I’m loving the finished look!
A big thumbs up to Mood Fabrics for finding this great knit and a very Happy Monday to all
I scored big time finding this beautiful Carolina Herrera Leopard Printed Stretch Silk Twill from Mood Fabrics. I ordered the fabric with a wrap dress in mind, but after the fabric arrived I came across a photograph of the Carolina Herrera original and decided to follow the style of the designer with a close fitting dress.
I reached for a favorite pattern I have made twice before – Vogue 9047. (Version one is here and version two is here.) The pattern is now out of print but still available on the website, Etsy and other online sources.While the ‘original’ dress is a sheath with princess seams in the front, my pattern features a separate bodice top and skirt with a raised waistline which provides easy fitting and shaping opportunities.
The fabric is impeccably thin, lightweight and slightly translucent. The Carolina Herrera dress is fully lined and features a back zipper.
A zipper was unnecessary with this pattern and I’m glad I did not disrupt the design of the fabric.
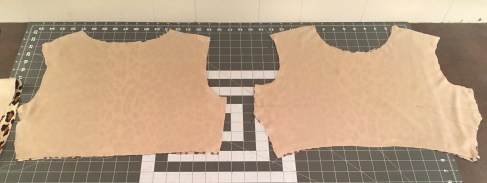
However, I underlined the dress with a very lightweight tricot lining. Below is a photo of the tricot basted to the bodice pieces (skirt pieces not shown but are underlined as well). The sleeves are not underlined.
What I’m loving about the fabric is the clever placement of the light and dark patterns. The patterns are designed to fall symmetrically around the garment. I chose the same placement as the ‘original’ but assume the darker area could be placed front and center.
The darker pattern is placed on the center of the sleeve for continuity of design around the shoulders and down the sides of the dress.
Because I ordered for a wrap dress I have a little leftover and hope to squeeze a top out of the remaining fabric. While I enjoy being creative with fabrics, I decided Carolina knows best on this one, and there was no reason to reinvent the wheel.
Just another dress? No way! One never forgets her first Carolina Herrera
Many thanks to Mood Fabrics for stocking this phenomenal fabric!
For some reason, my husband and I have not been to the beach together in almost one year!
Greetings from Edisto and Happy Memorial Day!
I didn’t know I wanted a pair of wide-leg beach pants until the Blue and White Bengal Cotton Seersucker arrived from Mood Fabrics. Seriously, I was planning a dress with a ruffle collar, but a new vision appeared once I opened the package.
This is no pinstripe seersucker, but a lovely light and airy fabric featuring 1/4″ stripes. It is slightly puckered with a wonderful drape making it suitable for several garments.
As one who almost always prefers a slim silhouette, I was ready for something different and pulled an old Vogue pattern from my stash. The pattern is out of print but available on Etsy and other online vendors. I unsuccessfully made the pattern once before during the first year I returned to sewing. Thankfully, I learned from the experience
Although I was ready for a little change, I questioned whether I could wear wide leg pants.
I selected View B which includes inset pockets.
The topstitching on the pocket fronts keeps them in place making the pockets nearly invisible.Since the pants are fitted in the waist and hips the wide legs do not overwhelm the garment and produce a more flattering silhouette than drawstring pants.
The back invisible zipper disappears into the stripes,
and the sash is shaped to lie flat around the waist. What a difference this makes!
The circumference of the pant leg is 21″. The seersucker has enough body to hold the shape but is light enough to billow in the breeze.
So rarely do I sew resort wear and vacation clothes, but this was fun once again proving it’s all about proportion and fit.
This sewing project was a reminder that sewing provides fashion options that money just can’t buy. Playing it safe has its place but perhaps sewing the straight and narrow should be the road less traveled
Lilly Pulitzer introduced a fabulous collection of navy dresses this season, and I wanted one too.
The Lilly dresses are available in every fabric imaginable bringing about many possibilities. My decision was based on the piece of Theory Navy Cotton Rib Knit I ordered from Mood Fabrics in March. (Now sold out but I highly recommend the navy stretch pique.)
While Lilly refers to many of its dresses as ‘shift dresses‘, they look like tunics to me, and so I made a tunic from The Tunic Bible.
Since this is at least the 40th tunic I’ve made during the last two years, I was interested in trying something different. I selected the wide-split placket and angled collar variation which I’ve only sewn with wovens, but the knit fabric accommodated the structured details of the pattern variation beautifully!
The Theory Knit is a heavier knit making it necessary to eliminate potential bulkiness in the collar and armscyes. To do this I sewed the under collar and seam bindings in Navy Silk Crepe de Chine from Mood.
The collar was interfaced with Pellon EK130 Easy-Knit, a fusible knit interfacing and supple stabilizer, and the seam bindings were cut on the bias and starched.
The trim is from M o r o c c o ! Before meeting up with the Amy Butler group, Julie Starr, Dorcas Ross (a.k.a. Art Attack and Lone Star Couture) and I hired a private tour guide. When asked about any special requests we quickly responded “Take us to the Fabric, Trim and Tunic souks!”
We found a tiny souk loaded with trim. I bought 5 meters of the metallic braided trim for $3/meter and certainly wish I bought more.
The trim was temporarily applied with Gunold KK100, a temporary adhesive spray before attaching it to the tunic with a zigzag stitch. The adhesive is supposed to disappear within 3 days…. If you look closely you can see the zigzag, but it truly melds into the braid due to its texture.
Sewing The Tunic Bible bodice pattern with a knit generally results in a more relaxed fit,
and eliminates the need for back darts.
The gold trim dresses up the tunic but Lilly also trims this same style in white for a fresh, casual look (this Oscar de la Renta lace from Mood being one of my favorites for a great summer look.)
As always, a huge thank you to Mood Fabrics for allowing me to experiment with quality fabrics and learn something new each and every time. Rib knit and metallic trim ~ a winner in my books!
_____________________________
Believe it or not there were over 400 entries for the Thread and Bucket Hat Giveaway! Many thanks for the wonderful response
Congratulations to BARABARA O winner of the giveaway!!! Please send your contact information to goodbyevalentino@gmail.com by Monday, July 3rd or a new winner will be selected.
Some of you asked questions which I could not answer in order to keep the response numbers in order, but I will do so once the giveaway is officially over and the winner has responded.
I’ve never been able to adopt the ‘keep it simple‘ philosophy, but I do believe in the ‘one step at a time‘ approach to life. In sewing that means sticking to the familiar while learning the new.
While I try to grasp the details of machine embroidery I’m sewing with patterns and fabrics that leave no surprises. Mood Fabrics offers a fabulous collection of cotton shirtings, and what better backdrop for cherry red than a black and white check! I knew this smooth shirting fabric with a soft drape would be perfect for a tunic and kept my fingers crossed that it would be compatible for embroidery. As with most Mood fabrics, it exceeded my expectations!
My pattern is from The Tunic Bible . I selected a simple inside-facing placket so the embroidery could be the star. Finished with a simple bias strip neckband, the placket can be worn closed or open (below).
Although it is color coded, I sewed the entire design using Coats & Clark’s Trilobal Embroidery Thread in Ming Cherry. Offered in 122 colors, the mini-king spools hold 1100 yards of thread and will see you through multiple projects.
The lines of the large checks served as ideal reference points for design placement, leading me to use a vertical black line to mark the center of the tunic (marked with a basting thread below).
I duplicated and mirrored the design on each side of the black stripe. When the designed was finished I noticed a big empty circle in the middle of the bodice.
I found a small motif similar in design which I duplicated, flipped and connected using the stylus.
Needless to say, it was a great relief to finish the design completely centered Before starting the embroidery I sewed the bust darts…….after the embroidery was completed I was ready to sew the bodice.
I added back darts for a more fitted silhouette.
I was undecided about embroidering the lower edge and/or sleeves, and concluded the cuffs should be embroidered. I selected split cuffs for a little pizzazz, and embroidered the design on a larger piece of fabric before cutting the cuff. This process made for easy placement.
If you’re curious about how long it takes to embroider a design, it all depends on the size and density. Each half of the bodice design took approximately 40 minutes to embroider. Each segment of the cuff took 2 and 1/2 minutes. Below is a 2 and a half minute video if you’re interested in watching the machine in action.
My only regret is not cutting the cuffs on the bias to echo the neckline finish – like I said….. keep it simple does not sink in with me.
So what’s my takeaway, here? Nothing happens without a good foundation. Whether it’s fabric, thread or a sewing machine, learning the ins and outs of each one step at a time will get you to the finish line without the overwhelming sensation of too much, too soon.
_______________________________
PS…. Many thanks for the lovely comments on my last post! As much as I enjoy responding to comments, I felt my responses would takeaway from Katie as well as the beauty of your heartfelt sentiments.
Writing my posts in a lighthearted spirit is and has always been my style, but today, no matter how my words come across, my heart is with family, friends and those who are affected by Hurricane Irma. May the force be with all who are enduring this monster storm.
What a phenomenal response to the Eloflex Giveaway! I try not to respond to comments during a giveaway since it disrupts the sequence of numbers for the Random Number Generator. However, many comments included questions about sewing with Eloflex and my jacket, so I’ve pulled the questions from your awesome responses which are answered below.
Where was the fabric purchased?
I bought the fabric at Mood Fabrics in 2015 and it is long gone. Mood discards records and invoices after a certain period of time, so I have no information about the fabric. So sorry
Why did you used Petersham Ribbon as a neck facing? Please show detailed photos.
Susan Khalje introduced me to Petersham Ribbon during a Couture Sewing class. Julie and I trimmed countless tunics in Petersham because the rayon thread with the braided edge is easy to shape unlike Polyester Grosgrain ribbon. I order the ribbon from thesewingplace.com
I stitched the ribbon on the right side of the garment extending the ribbon a 1/2″ beyond each edge.
After the seam was pressed toward the facing I under-stitched the seam before turning it to the inside of the jacket.
I pressed the extended ribbon under the seam and topstitched.
Zipper Open
Zipper Closed
Another advantage of Petersham Ribbon is it produces less bulk as a single layer over seam binding which is often folded to produce a finished edge.
I thought white topstitching was the way to go on the front. I used black in the bobbin, but the white thread still pops through on the underside.
What precautions should be taken when winding Eloflex on the bobbin?
I simply wind as usual, but I always wind my bobbins slowly.
Are there any issues with tension?
I did not experience any tension issues. I adjusted to slightly less tension since the knit was heavier than the lightweight wovens I typically sew.
What stitch length did I use? Did you use a straight stitch or zig-zag?
I used a 3.5 stitch length on this garment. When sewing with Eloflex, you may sew with a straight stitch.
Currently Eloflex is available at JoAnn Fabrics and Hobby Lobby. A good online source for the thread is createforless.com or you can order it directly from the Coats & Clark consumer service department at (800)648-1479.
Any word on where to buy in Canada? South Africa?
I’ve just learned from a reader that Eloflex is available in all Fabricville stores in Canada. I’m not sure about South Africa, but will check in with Coats and Clark.
And now….. Congratulations to SANDRA (entry 413 EMAIL: kirksiffs@________) , winner of the ELOFLEX giveaway!
Please send your contact information to goodbyevalentino@gmail.com by Thursday, September 14 or a new winner will be selected.
Many thanks to all readers for you wonderful comments and enthusiasm over the new Eloflex thread!
Raise your hand if you’re an Oscar de la Renta fan.
That would be me!
Frankly I should raise both hands. I think Oscar de la Renta makes the best party dresses on earth! I’m drawn to the gorgeous fabric, clear colors and flattering fits, especially in the bodice.
One of these days I might just break down and buy one, but until that time comes, I’ll keep sewing O D L R inspired dresses.
Mood Fabric’s Red and Black 3-D Floral Brocade has party dress written all over it, and I placed an order for 3 1/2 yards of this mid-weight brocade. Little did I know I would cut out three patterns before finding one to showcase the beauty and dimension of this fabric! The fabric features a diagonal design which I realized needed to be treated like a stripe.
The 16- piece pattern allowed for strategic fabric placement letting me take advantage of the diagonal design, and I was able to create a mirrored effect with the pattern.
I’m fond of the dress silhouette although I don’t wear it often.
Being intent on a snugly fit bodice, I cut the back out in a smaller size, then sewed 1″ seams. Anything other than a snug fit would have resulted in slipping shoulders and gapes in the back-V.
Unless I’m sewing a decorative or separating zipper, my favorite zipper method is using the invisible zipper, and I used a Coats and Clark 14″ invisible zipper for this dress. I’ve tried every technique from hand inserted pic-stitched zippers to lapped zippers. I find inserting an invisible zipper with an invisible zipper foot always produces a nice clean finish with only the zipper pull in sight. (click on photo above or below for close-up look)
3 & 1/2 yards of brocade makes for a heavy dress, so I decided to line only the bodice. I know this decision knocks the dress out of the Oscar de la Renta echelon, but I did not want to wear a 10 pound dress! This brocade features a non-scratchy backing, and I finished each edge on the serger before stitching the pieces together.
I’m happy with the decision! The brocade has unbelievable body, does not wrinkle, and the skirt portion did not need to be lined. (PS – the skirt circumference is 144″ !)
Mood Fabrics stocks an abundance of beautiful brocades! Other than a tendency to ravel, I find brocade easy to handle, and the result is almost always festive – a definite win-win scenario.
I encourage you to give this delightful fabric a try for you holiday sewing, and now…..let the party begin!
I don’t know what else to call it. It’s done – it took forever – I like it……
Introducing the The McVoguerick Tunicbiblicity dress.
It was time for a new black winter dress; an all purpose dress to wear whenever and wherever.
As mentioned in the last post I had it bad for another Oscar de la Renta RTW dress.
I love the way this dress skims the body, but I had no pattern that included all of its features,
so I gathered patterns from my stash that bore any resemblance to the dress and created a muslin.
I used Simplicity 1586 for the bodice. The bodice was similar but frankly, I was sold on the words Amazing Fit . What a great marketing tool.
After cutting the bodice from the pattern, I measured the upper bodice length from Vogue 9047, a pattern I’ve successfully sewn twice. I cut the bodice into an upper and lower bodice at that point. I did not add a seam allowance due to my height. The seam allowance was already built in to the upper bodice, and by eliminating the seam allowance for the lower bodice, the bodice length was automatically shortened.
I tweaked the Upper and Lower Bodice pieces until achieving the fit I was seeking. Sewing an upper and lower bodice allowed me to gain a wonderful fit under the bust (shown in the lightened photo below) and in the mid-back area.
The flounce was cut from McCall’s 6988. It worked out perfectly but I was prepared to use Mary Funt’s incredible Flounce Tutorial if necessary.
I placed the flounce four inches below my hips.
After sewing the bodice muslin I selected the sleeves from The Tunic Bible. I’ve substituted this pattern piece before in other garments.
Its pebbly surface creates a gentle texture, and the excellent drape makes it ideal for numerous garments.
The crepe also features a slight give along the crosswise grain.
I lined the dress with Mood’s Black China Silk/Habotai. The lightweight China Silk made for an ideal lining which was drafted from the muslin pieces.
Thank you all so much for your opinions regarding lining the flounce! I was concerned that lining the flounce would affect it’s overall drape and movement, but after learning the flounce was lined in the ODLR dress, I decided to line it, and the lightweight silk did not affect its drape or movement.
Lining the flounce also provided an easy way to hem the dress. The lining and fashion fabric were sewn right sides together, on the lower edge, flipped and then attached to the bodice. FYI – Mood’s China Silk is available in 95 colors!
After justifying how much money I saved by sewing this dress I bought the embroidered boots. It was a weak moment and a big splurge, but just so you know – I did not embroider the boots
In closing, I am pleased overall with the result, but in seeking perfection, I want to sew it one more time with a few more tweaks!
If you’re wondering what to sew next – think basic black!
How’s the turkey coming along? Ready to start your Christmas and holiday shopping? Here we go……….!
Please join me for a wonderful year of all sewing and no shopping beginning January 1, 2018.
For new Goodbye Valentino readers, my blog originated in 2011 when I decided to quit buying clothes for one year in favor of sewing my clothes. Since that time I hosted another RTW Fast in 2014, but my oh my, how quickly four years have passed and Dear Readers, it’s time for renewal!
______________________________________________
The wonderful sewing industry has teamed up with me to make this the best Ready To Wear Fast ever! We will provide continuing focal points, interviews, giveaways and incentives to the participants for an unbelievable year. Giveaways include:
Fabrics Galore!
Fabulous threads and notions!
Lots of online classes!
this means a sewing machine
Monthly giveaways from the following pattern companies!
+ More!
Discover your style, improve your sewing skills and bond with your online sewing friends!
What exactly is the Ready To Wear Fast?
The Ready to Wear Fast is a vow to abstain from buying clothes for one year. You will give up buying clothes from January 1 – December 31, 2018. You may sew anything, and you may fabric shop as much as you would like! The purpose is to Save Money and Improve Your Sewing Skills, but believe me, the rewards of the commitment will exceed your expectations.
Frequently asked questions.
1.May I buy sweaters since I don’t knit?
No, you may not buy sweaters.
2. What about bathing suits?
No, you may not buy a bathing suit.
3. I’m attending a ball this year. May I buy a ball gown?
No you may not buy a ball gown.
4. Do I have to make my wedding dress?
Please buy the wedding dress of your dreams. A wedding dress or bridesmaid’s dress is the only exception.
5. What about scarves?
No
6. What can we buy during 2018?
You many buy underwear, socks, jewelry, handbags and belts.
7. Can we buy shoes on a Ready to Wear Fast?
Y E S !! Shoes are allowed – Enjoy
8. Can I wear the Ready to Wear clothes I bought before the Fast?
Yes, absolutely.
9. May we accept gifts of clothing?
Of course.
10. Can we buy thrift shop clothes to refashion?
No. I encourage you to refashion clothes from your closet.
Please R.S.V.P. by December 31, 2017 to 2018rtwfast@gmail.com with the following:
1. your name
2. photo
3. your Facebook name – Facebook is a convenient method for all of the Fasters to communicate. I will also be using Instagram and hope you will too #2018rtwfast.
4. blog address if you have one
I hope you’ll join me in the festivities of sewing during 2018. You’ve got over a whole month to prepare for a whole year of sewing, saving and looking fab!
What would you do if you received a scarf with which you had nothing to wear?
1 – “Thank you for the scarf but I never wear these colors. Please give it to someone who can enjoy it.”
2 – Put it in the closet and forget about it.
3 – Sew a new garment to wear with the scarf.
LOL – The scarf is gorgeous and while it looks good on black, it didn’t look good on me on black.
Decades ago when people ‘had their colors done’………(Color Me Beautiful), I was labeled a SPRING and its, true… I look best in clear spring colors. However, I learned the key to wearing an unflattering color is to wear white around your face.
Mood Fabrics’ beautiful stretch jacquard by Jay Godfrey is not in the Spring color palette, but I can wear it when combined with a white collar to separate the color from my face.
So let’s talk sewing….. Style Arc’s Coral Cardigan caught my eye.
I liked the nifty shorter front neck band and inseam pockets, and though it’s designed for knits, this jacquard is extremely stretchy.
Here it is without the scarf.
Due to its oversized nature I cut out a smaller size (size 4) and made no adjustments at all.
Style Arc instructions often confuse me because they do not feature the traditional sewing language I learned. I love the patterns, but I meditate heavily on each step before proceeding.
After the front and back bodices are attached at the shoulders, the band is stitched directly on top of the bodice.
Next the entire edge of the cardigan is finished in one step. (I stabilized the lower bodice edge with Steam a Seam before turning and topstitching – not pictured.)
The threads disappeared into the fabric’s texture and colors so all edges were finished on the serger making this garment quick and easy!
It’s a well-designed pattern with interesting features and a great fit for an oversized garment.
The bands end right at the waist, and since I’m wearing contrasting colors I’ve tucked in the shirt to avoid having three lengths of contrasting colors front and center. A solid color underneath would be different.
Quite often it takes an outside force to make me leave my comfort zone and try something new. Many thanks to my dear friend for the scarf! I’ve got a new color to wear – maybe she knew something I didn’t
I’ve owned a few formal sequined dresses over the years, and while sequined ball gowns are still around, shifting trends in the fabric now feature more relaxed styles from cocktail dresses to t-shirts. I made the dress for an annual Christmas dinner party and chose a simple pattern to keep the dress from appearing too formal.
My base pattern is New Look 6524, a shift pattern I purchased a while ago for the sleeve variations. My original plan was to sew View B.
Before making a muslin I had to remove the bust dart, and followed Maria Denmark’s tutorial for a perfect result. The tutorial is slightly time consuming but 100% accurate and provided me with a clean bodice front.
The sequins are sewn on mesh and the fabric tends to s t r e t c h easily. The fabric is also heavy.
Staystiching the shoulders, armscye and neckline immediately upon cutting prevented shape distortion.
After inserting an invisible zipper and attaching the shoulder seams I basted the side seams several times until the fit was just right. The photo below will give you an idea about how the fabric behaved.
Photo 1 is the muslin after I removed the bust dart. I pinned out a little excess along the side to get the fit I wanted. Photo 2 shows my first round of fitting the dress. Although I knew the stretch in the fabric would provide a larger fit I wasn’t expecting the baby doll effect. It’s also too short. Photo 3 shows the garment fitted to my satisfaction with the hem pinned and lowered. I removed up to two additional inches on each side.
After attaching the shoulders and basting the side seams, I decided the ruffle sleeve was too much of a good thing and chose a simple cap sleeve to keep the style classic and relaxed.
But now ….. the lining…….. oh my goodness. I bought the pewter stretch charmeuse in Florence from Casa Dei Tessuti in 2015. I bought it to line my Mother of the Bride dress for Mimi’s wedding which I never made. It is luxurious. I almost regret using it to line a dress that will be worn occasionally, but it elevates the dress immensely. I must find more without traveling to Europe!
Sewing with sequins is not difficult
Keep a trash can close at hand as the sequins will scatter with gusto when the fabric is cut. Sequins can dull your scissors so it’s best to use a dedicated pair of scissors. I used a denim needle for the dress and a microtex needle for the charmeuse. Although I’ve read that ‘finger pressing’ sequins is recommended, I pressed the seams with an iron using a silk organza press cloth.
The season to glisten and shine has arrived ~ Happy Holidays to all and a big T h a n k Y o u to Mood Fabrics!
15 more days until the 2018 RTW Fast begins! Join Me with your R.S.V.P. to: 2018rtwfast@gmail.com by December 31
Please include Your Name, Photo, Facebook Name and Blog Address (if you have one)
I hope you are all enjoying this holiday season! Below is my Christmas dress and the last project of 2017.
The pattern, McCall’s 6886 is a classic that’s been around for awhile, and has received nearly 200 reviews on the Pattern Review website. Believe it or not, this is the first time I’ve sewn the simple pattern.
While sewing the dress was simple, taking photographs was not………..
Failed flashes, poor lighting, a squirming baby, windy weather etc… prevented us from getting flattering pics,
but it was the perfect dress for my typical Christmas – not too dressy, festive and comfortable.
The Oscar de la Renta neoprene from Mood Fabrics is the best, leading me to order 4 more yards. The Kelly Green is now sold out but other colors in this perfect weight scuba knit are available.
I embellished the sleeves with ruffles, and while they added a festive touch to the dress, the fabric is a little heavy for this feature. I plan to sew it again keeping it simple, possibly using one of my go to patterns such as Vogue 9047.
If you’re not using Eloflex Thread for sewing knits, you’re missing a good thing! I truly cannot recommend this stretch thread highly enough. Manufactured by Coats & Clark, Eloflex thread allows you to use a straight stitch on knits and will not snap or break. I use it in the bobbin as well.
It is especially perfect for topstitching necklines.
So here we are almost at the end of the busy holiday season. As I mentioned on Instagram, Hubby and I came across this snowman tree at a party and are ready to incorporate it’s simplicity into our lives on a regular basis.
It’s been fun but I’m ready to wind down, get organized and head back to my sewing room!
5 more days!
R.S.V.P. by December 31 with your name, photo, and Facebook account name to
Several years ago I asked a woman at a tradeshow about when her business started to become successful.
“When I decided to get serious about it.” she replied.
I believe there is a lot of truth in that statement with intention and commitment playing primary roles in our successes and failures, no matter how large or small the undertaking.
While all years seem to have their share of ups and downs some are certainly better than others. Fortunately, things seemed to click this year.
After taking time off to promote The Tunic Bible, a return to sewing and blogging in January was refreshing and relaxing. I did not list the Armani wool knit hooded cardigan as one of the #2017 best 9, but it represents a shift from the chaotic year of 2016 to a mindset of focus and creativity for the new year.
I will never know how I won the Mood Sewing Network African Waxed Cotton Challenge Facebook competition, but I was highly flattered and humbled to win.
Thanks to you, The Tunic Bible sold very well throughout 2017, and it was thrilling to watch the book climb to #1 on the Amazon bestseller list in its category during the summer months. We’re tickled the book has been nominated as one of the Pattern Review Website’s Best Pattern of 2017! (Voting continues through today)
Julie and I continued our quest to promote the book and thoroughly enjoyed conducting Tunic Bible Workshops and Trunk Shows together.
Below we are pictured with the cute blogger Megan Francine who attended a trunk show in Charleston.
I was excited to become a contributor for the Coats and Clark website, which I kicked off by sewing a collection of bucket hats. (more here).
To my great surprise and utter delight, Pfaff asked me to be its ambassador . In July began sewing with the Creative 4.5 and began to learn how to embroider.
I received the Creative Icon in October, and sewing will never be the same.
My desire to perfect embroidery techniques has almost become obsessive, especially after embroidering my first customized neckline on the Creative Icon.
If I had to choose my favorites for the year, I’d go with the ones below, continuing my love of tunics, tops and dresses now punctuated with embroidery.
From left to right starting at the top:
The Tunic Bible
Vogue 8997
McCall’s 7543
Burda 6722 ( I wear it ALL the time )
Style Arc Cold Shoulder Knit Top
McCall’s 6844
The Tunic Bible
New Look 6542
The McVoguerick Tunicbiblicity dress
Thank you dear Readers for making this year one of the best sewing years ever!
I’m really looking forward to 2018, and am excited about new opportunities during the year. In February I’ll be in Cleveland taping three series for the PBS show, It’s Sew Easy.
Through it all one of my greatest joys is meeting like-minded sewists and Goodbye Valentino readers.
The Nashville ASG chapter has invited me to speak and host a Tunic Bible Workshop in March.
Julie and I will be in Plano, TX in September hosting a trunk show and Tunic Bible Workshop for the Plano ASG Chapter, and if the stars align I’ll be in Honolulu in November speaking and conducting a workshop.
I’d love to meet all of you and if you’re ever interested in getting together please check the page of available presentations offered here.
Thank you for a most wonderful year, and best wishes for a healthy, happy and prosperous New Year!
with love and appreciation,
Sarah
PS………The RTW Fast is shaping up nicely and I can’t wait to introduce you to the 2018 Fasters
It’s time for me and nearly 1,000 other women (and two men) to stop shopping and start sewing for an entire year .
Greetings on this cold winter day…..
I’m simply elated and happily overwhelmed that close to 1,000 sewists from around the globe have joined me to reap the benefits of sewing their clothes rather than shopping for one year. New Year’s Eve brought a rush of people (400+) to the RTW Fast, and we are steadily working on organizing the group to present on the blog.
J u s t d o i t .
Whether it’s organizing a sewing space or picking up the scissors, jump in and go!
Many thanks to all of the brave souls who have joined me to celebrate the wonderful world of sewing one’s wardrobe and nurturing our creative capabilities. A special thank you also to those cheering us on
Before I get back to work, a little RTW Fast housekeeping:
1.Feel free to use this badge on your blog or social media.
2. Make sure your Facebook account is set to the default email address for your Facebook account or you may have trouble joining the group.
3. When posting to Instagram please hashtag #2018rtwfast
Excuse today’s brevity – I cannot wait to get back to you!
Be back soon.
! H A P P Y N E W Y E A R !
The invitation to join the 2018 RTW FAST will close today at midnight EST.
Happy 5th of January and meet the 2018 RTW Fasters! Dear Readers,
What a thrill it is to be in the company of over 1,000 women (and two men) fasting from the Ready to Wear scene during 2018. From young singles, moms-to-be, new moms, professionals, newly retired, grandmothers, great-grandmothers, to petite, plus size and somewhere in between, I am accompanied from women around the world representing every continent except Antartica.
With varying skills and styles, all of the Fasters have much to offer each other. Whether advising about technical and design issues, sharing great finds or simply conveying a fresh attitude towards creating a wardrobe, I predict a year filled with continuing inspiration.
Several of the Fasters have inspired me for years, and I’m honored to have them on board, but I am meeting hundreds in the group for the first time! I’m a huge believer in the more the merrier, and this lovely response is heartwarming. A huge W E L C O M E to all!
The RSVP was extended through January 1. For those of you who responded after January 1 and received the auto-response regarding that it was too late, I will work you in during the month but please be patient. No requests to participate received after January 4 will be considered.
OK – we worked with Google Sheets to create the database and it has been less than pleasant. Katie Burris and I worked under the assumption that the document could be downloaded as any number of formats but not so. I even called in my webmaster who could not convert or copy the image-heavy document successfully.
You’ll notice two 2018 RTW Fasters’ pages at the top of the blog. One is entitled The 2018 RTW Fasters. On this page the Google Sheets document is embedded in the page. It will take a moment to load, but it features working links and scrolls easily. If you use a computer for browsing, this page is for you. It’s takes my very new computer 45 seconds to load.
For iPad users please open the page entitled 2018 RTW Fasters for iPads and small devices. This page features a link that will take you to the document. Below the sponsors, I have also provided a list of the Fasters’ and blog names (no links).
Obviously I hope to get this situation resolved but for now here we are.
I think of Mood Fabrics as the king of fabric stores. Located in the heart of the NYC Garment District, this 3-story wonderland of fabrics is the Project Runway go-to store and offers every fabric you can possibly imagine.
(RTW Faster Mary Rames on her first shopping trip to Mood Fabrics last year.)
Were it not for Mood Fabrics I might not be sewing. In 2012 I was invited to be one of nine members of The Mood Sewing Network .
Each month we are given a limited gift certificate to choose whatever fabric we’d like. Our only responsibility is to publish a monthly post featuring the fabric we selected. As part of The Mood Sewing Network I’ve had the privilege to experiment with many fabrics I might not have purchased. This honor has expanded my knowledge of fabric as well as familiarized me with the online fabric purchase scene. I enjoy passing my experiences on to readers, and hope my participation has been helpful to you.
Please visit the store if you’re ever in NYC. The bustling atmosphere is filled with a contagious excitement, and with over 1,200 customers a day, you never know who you might see! Mood’s mascot, Swatch is happy to pose for photos too.
The Sauma family, owners of Mood Fabrics are pleased to support The 2018 Ready to Wear Fast by offering a $100 Gift Certificate for one lucky faster! Thank you, Mood
Congratulaions to Faster #456 as winner of the Mood Gift Certificate. Please respond to goodbyevalentino@gmail.com by Sunday, January 7 to claim your prize or a new winner will be selected.
…… and we’re off!
Best wishes to all for a wonderful weekend and thanks for your patience in getting this organized. After a two week break, I’m ready for a little sewing now………….
Until soon!
PS……… Just so you know, I am anticipating frustrations for some readers when opening the RTW Fasters’ pages. I am requesting that you do not leave comments about this since there is nothing I can do right now. Many thanks.
If you think I made the same dress twice I can understand why…….
Greetings!
My first dress for the 2018 RTW Fast is the same fabric as my last dress – the Christmas dress blogged here. I knew from the moment I finished it, there was room for improvement, so much so, that I ordered more fabric and made another dress with another pattern using my old favorite ~ Vogue 9047.
I adore the vivid color and texture of the Oscar de la Renta scuba knit and was determined to get it right on my second try, but I needed to pinpoint what went wrong the first time.
Dress #1 (below) is a fitted shift. As easy as it was to sew, I find fitting a shift can be tricky and I hurriedly finished the dress to wear it for Christmas.
The fit of the front was OK, but I always tugged it in place whenever I stood up.
The scuba knit was too heavy for the ruffled sleeve embellishment.
The fit features negative ease in the bust and no ease in the hips ~ there is slack through the waist and in the back.
4. I added darts to the back which helped with the fit, but due to the weight of the fabric and its solid color, they are extremely noticeable.
Dress #2 Vogue 9047isa favorite pattern of mine. It is designed for my shape, and I’ve sewn the pattern several times.I removed the bust darts following the excellent Maria Denmark tutorial to achieve a smooth upper bodice.
The division of upper and lower bodices provides several opportunities to gain a flattering fit. Tweaking the side seams before attaching the upper and lower bodices allowed me to eliminate the slack in the waist and fit my hips.
The back is a 100% improvement over Dress #1, and no darts.
Since all knits behave differently, I always baste before sewing to get the fit just so. While the scuba has ample stretch, its weight affected the overall look and fit. A small wrinkle or fold in a lightweight knit is hardly noticeable, but on a solid color scuba it becomes the main attraction.
I sewed the garment with the stretchable Eloflex thread. While this is unconventional, I used a jeans needle. I don’t know why but the needle worked beautifully with the thread and fabric. I also sewed using a 2.5 and 3 stitch length. Eloflex provides a beautiful stretch result without requiring a zigzag stitch.
I followed a favorite knit neckline technique by folding the neckline and trimming close to the stitching.
Use sharp scissors and don’t be afraid!
Dress #1 also made me realize it was time for a new iron.
There is a first time for everything, and this is the first time I’ve reordered the same fabric to sew another similar garment due to a mediocre result. However I’m glad I did so I could not only redeem myself, but wear this lovely color. The fabric is an Oscar de la Renta scuba knit from Mood Fabrics. I bought the last of the green, but it is still available in Waterfall Blue.
Discovering a pattern that is just your style is pure gold. I have a few and have just added a new one to the collection.
Winter just got a whole lot better
After browsing through a stack of Christmas catalogs during the holidays, I was convinced I needed a pair of patterned leggings and ordered Mood Fabric’s ultra soft black wool knit with orchid pink medallions. Opening the box of fabric long after the catalogs were thrown away brought me back to reality and I reassessed.
The leggings would be cute if I was 10 or on a Scandinavian vacation….. but I couldn’t pull it off in South Carolina.
In the midst of my recent sewing room organization project, I rediscovered the piece of double faced knit purchased on a whim at JoAnn’s in the fall of 2016. The Blackwood Cardigan pattern by Helen’s Closet had been downloaded on the computer for months, and somehow, in the thick of it all, a sweater was born.
As I studied the pattern illustration I noticed several opportunities to customize the pattern, and having no real plan allowed me to experiment with the whimsical fabric.
I used the stripes for the bodice and the dots for the cuffs & bands. It’s fun and perfect for a Saturday afternoon!Aside from omitting the pockets, shortening the lower band by 2″ was my only change to the pattern. Keeping the contrast front and lower band the same size nicely framed the bodice and resulted in a better proportion for me.
But once wasn’t enough!
As soon as I completed the cardigan I knew exactly what to do with the wonderful wool medallion knit (Mood Fabrics also sells this lovely knit in black with a green medallion.)
Again I made a few slight design alterations to let this fabric shine!
The front band and sleeve cuffs were sewn in a contrasting fabric – a black rib knit from Mood. In order to avoid disrupting the medallion pattern, I omitted the lower band and extended the length of the bodice to match the length of the front band.
The sleeves are designed to be very long and my arms are on the short side. I wanted to keep the length on the sleeve so I shortened the cuff by two inches. I realized the longer sleeve and shorter cuff make my arms look longer so this may become a permanent alteration!
All of the seams (for both cardigans) were finished on the serger.
Since I omitted the lower band, I stabilized the hem by placing a 1″ piece of interfacing directly below the hemline.
The interfacing was serged along the lower edge, turned and machine hemmed.
There’s nothing better for the sewing mojo than an easy pattern with a good fit combined with a fabulous fabric, and with wools like this, bring on the Arctic Blast!
Many thanks to my friend, Julie Starr for insisting I try this award winning pattern ……… and speaking of which I’m delighted to announce that The Tunic Bible received a Best Pattern Award from the Pattern Review website!
We are honored and grateful to the 400,000 members of Pattern Review.com for voting The Tunic Bible as the #1 Best Woven Top Pattern for 2017!! Many thanks to everyone who has supported us on our book journey. We LOVE seeing your tunics. Full blog post listing winners in each category is up on the PR website.
No need to call me Dr. Gunn, but I suppose if I was a physician I’d look a little like this minus the buttons and sunglasses
It takes me very little to get excited about Spring, and after returning from Cleveland’s ice and snow to a few warm days of sunshine and blooming cherry trees, I am keen to sew for the upcoming season.
One of these days I might sew a capsule wardrobe, and if I do this is my first piece. Based on my Capsule Wardrobe Pinterest board one might think I was a capsule wardrobe consultant. I’m obsessed, but I’ve been unable to commit.
My jacket is inspired from the pin below, but I brightened the color to better coordinate with several of my warm weather clothes.
I wanted to sew a fairly close fitting jacket with this white cotton canvas from Mood Fabrics. An oversized garment in this stiff fabric would be bulky and unflattering and I settled on McCall’s 6520, a shirtdress pattern. The pattern was in my stash and I loved the fact that it did not have bust darts. I sewed View D.
To give the pattern a more jacket-like appearance, I:
Cut out the pattern one size larger.
Used a heavier interfacing in the cuffs and collar
Removed most of the curve from the waistline for a straighter bodice
Shortened the length by six inches
Added two patch pockets
Finished the bodice and shoulders with flat-felled seams
Thanks to the faux tortoise shell buttons the jacket will also coordinate with neutrals. While I doubt I’ll ever streamline my closet down to a minimal wardrobe (the true definition of a capsule wardrobe – interesting article here) I do intend to sew with purpose this year, and any garment that coordinates with existing clothes is a winner in my books
After making the white jacket (blogged here), McCall’s 6520 turned out to be just the pattern I was looking for; a semi-structured dress with a classic fit and a little tailoring.
I had a difficult time believing this whimsical Oscar de la Renta print is canvas, but now, not only am I believer – I’m practically a canvas convert.
The fabric is from the Mood Fabrics stretch-canvas collection. I knew I’d like any fabric designed by Oscar de la Renta, but I was surprised by its light weight and smooth texture. Mood offers a huge selection of canvas for both home decorating and apparel sewing but limited pieces with stretch.
While this stretch canvas would work well with several garments, including jeans and jackets, I wanted a casual daytime dress.
One that would work with boots, sandals and everything in between.
So let’s talk sewing….
I selected View D. I’m not sure I’ve ever bought a pattern in which the first two views are designed for woven and the third and fourth views are designed for knits, but Views C & D are designed for stretch knits. The canvas met the stretch requirements, giving me the green light to proceed.
Even though the canvas is lighter weight, I knew it did not have the drape of a knit so I decided to fit the back by adding two darts which blend into the fabric.
The fabric reminds me of a dressed up denim and I treated it as such.
To give the dress more of a denim dress appearance I topstitched the collar, cuffs and front bands. I opted NOT to topstitch the sash for fear of making it too stiff. As in the previous jacket I used flat-felled seams for the shoulders and bodice.
Since I fitted the back, the dress wears nicely both with and without the sash.
Many thanks to RTW FASTER, Laura Casey for surprising me with the cute two-toned buttons nearly five years ago! At the time Laura was working for the fabulous Asheville, NC fabric store, Waechter’s Silk Shop (no longer in business ). I have waited for the perfect opportunity to use them and this was it!
The moral of this story?
You can’t go wrong with classic style and quality fabric ….not to mention three days of sewing.


 The fabric is impeccably thin, lightweight and slightly translucent. The Carolina Herrera dress is fully lined and features a back zipper.


 Since this is at least the 40th tunic I’ve made during the last two years, I was interested in trying something different. I selected the wide-split placket and angled collar variation which I’ve only sewn with wovens, but the knit fabric accommodated the structured details of the pattern variation beautifully!


 and eliminates the need for back darts.


 I selected split cuffs for a little pizzazz, and embroidered the design on a larger piece of fabric before cutting the cuff. This process made for easy placement.


 Failed flashes, poor lighting, a squirming baby, windy weather etc… prevented us from getting flattering pics,


