Quantcast
Channel: Mood Fabrics – Goodbye Valentino
Viewing all 118 articles
Browse latest View live

Vogue 9017 and Butterick 4856

$
0
0

Greetings from Talbots ;)

IMG_0092

Hmmm…… my last two garments have turned out rather so-s0.

Contrary to most of the clothes I’ve sewn during the last year, my life is not an endless parade of beach vacations and parties. (Such a pity!)

Let’s look at the latest. My pattern is Vogue 9017.

I am trying to remedy my lack of everyday clothes with a few practical choices, and selected a gray ponte knit from Mood Fabrics.

It’s a lovely fabric. Mood Fabrics compares this particular ponte to a gray wool suiting, and the weave of varying shades of gray give the fabric an appealing depth of color.

IMG_0054

I could not pass up the interesting lines found in the sketch of Vogue 9017, a pattern designed for woven fabrics and stable knits.

                   V9017 sketch

  I particularly like the raised and curved waistline,

IMG_0103

and slim silhouette!

Mood Fabrics ponte knit

 Since all knits behave differently, I rarely make a muslin for knit clothing and did not make one for this dress. I adjusted the bodice length on all of the pattern pieces and fit myself as I went along. Rarely do I experience an issue free sewing project, but the pattern is well-drafted, and the ponte sewed very nicely.

To give the dress a sportier appearance I shortened the sleeves and used a contemporary zipper.

IMG_0074                IMG_0076

 Once again I turned to the free Craftsy Mastering Zipper Techniques Class for zipper guidance, and am pleased with the result!

IMG_0111

But overall, my dress is rather lackluster.

Below is the garment I completed last week.

IMG_0011

The pattern is Butterick 4856, which is out of print. Continuing on my tunic quest, I used a cotton voile from Mood Fabrics. Fall colors in a lightweight fabric seemed perfect to me. The tunic had a nice drape until I sewed a heavier band around the bottom. I also believe I should have added a black trim around the neckline rather than gold studs.

Here I am at a football game.

SubstandardFullSizeRender

As much as I want to sew wardrobe staples, I’m finding the goal difficult to reach with pizzazz.

But I’m not giving up!

IMG_0125

 Until soon :)


Rite of Passage I

$
0
0

IMG_1525

I’m convinced there are a few rites of passage into the online sewing community. One of them is making Sewaholic’s Renfrew Top. In spite of dozens of good reviews boasting the merits of this simple pattern, I remained reluctant to give it a try. I’ve sewn several disappointing knit tops during the past two years – why would I want to sew another one?

Well, sooner or later most people come around to join the masses and I did too.

Described as ‘the knit top pattern for people who dislike sewing with knits’ I bought the pattern and waited for a vision to occur. It took a pair of leather jeans (bought in August at 90% off!) and this wool knit from Mood Fabrics to generate a vision for the pattern but alas, I have finally sewn the Renfrew Top!

IMG_1501Indeed, it’s a pattern that I plan to sew again. Removing 3 inches of length from the bodice was the key to a successful fit.

IMG_1466

While I truly love the top’s scoop neckline, the genius of the Renfrew Top is found in the bands. The neck, bottom and arms are unified with banded hems eliminating the double-needle topstitched hem.

IMG_1504

 Best of all, I completed the top in 2 ½ hours – but I bet you already knew that!

It’s nice to finally be on board with Sewaholic fans across the globe and I hope to tackle what I consider to be the next ‘Rite of Passage’ later this fall.   Can you guess what it is? (Hint….. it has buttons :) )

IMG_1506

Best wishes to all!

The Shanel SUIT

$
0
0

I always thought I wanted to be cremated, but now I’m not so sure.

www.goodbyevalentino.com - The Shanel SuitI mean, now that I’ve got something to wear……….

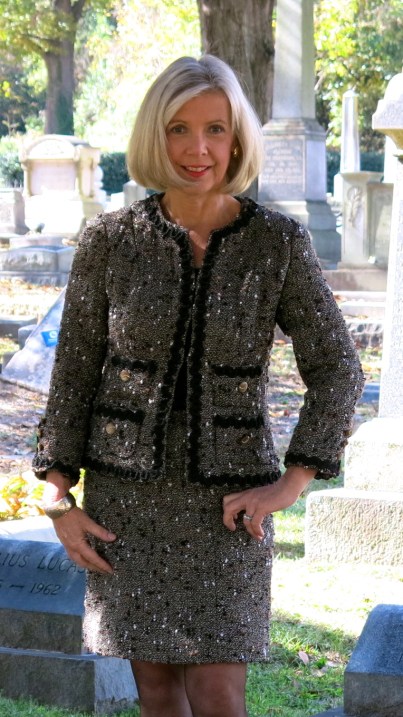
At last, I have completed the coordinating skirt to my Shanel Jacket, which means I have a brand new suit!

www.goodbyevalentino.com - The Shanel Suit

Goodness, I never wear suits, but I’m going to start,

www.goodbyevalentino.com - The Shanel Suit and pray I am lucky enough to wear this one out before it’s time to go. ;)

________________

Over the last 26 months I’ve sewn many skirt patterns and deemed Simplicity 3648 worthy of sewing the last yard of the lofty Chanel tweed.

I so wish the camera could capture the beautiful metallic thread in the fabric! Can you see it now?

IMG_2883

The skirt is one of Simplicity’s Amazing Fit patterns featuring six panels plus a two-piece waistband. Separate front and back pattern pieces are included for a slim, average and curvy fit.  After sewing the front and back to the side panels, the fine-tuned fitting  is found in adjusting the sides seams.

www.goodbyevalentino.com - The Shanel SuitI selected this pattern due to the controlled fit the six panels produce.  This is my third time to sew the pattern, and while the pattern is somewhat quirky (humongous side seams for instance) I knew I could get a nice result.

The pleats were a _______ to sew with such thick fabric – I don’t recommend it! I finally tamed the beasts by hand-stitching the layers together followed by a power pressing inside and out (using a piece of silk organza for a presscloth).

www.goodbyevalentino.com - The Shanel Suit

I lined the skirt with a luxury silk charmeuse I found at Mood Fabrics last month which I do not see on the Mood website. I was slightly sick spending $$$$$ on lining, but being the perfect color and so near the finish line propelled me to go for it.

‘Don’t I get my fabric at Mood for free, you’re thinking?’

I receive a monthly allowance, which I try to adhere to online. However, I was like a child in a candy store and bought way over my designated amount.

www.goodbyevalentino.com - The Shanel Suit

Now that the skirt is completed I’m glad I invested in such a fine lining, for it makes a huge difference in the final result.

I admit I am starting to spoil myself with high-end sewing. I do consider the entire Susan Khalje, Chanel Fabric, French jacket, trips to NY, Baltimore and now Shanel Suit experiences cherished investments I hope to apply to my everyday life in and out of the sewing room.

But for now, all I can say is Mission Accomplished and perhaps, time for a reality check!

www.goodbyevalentino.com - The Shanel Suit

Best wishes :)

Metallic Party Dress

$
0
0

More fabric to die for……. I was sold upon reading Mood Fabrics’ narrative of this silk/viscose blend and placed it in my online cart.

302697

 ‘The drape on this silk and viscose blend fabric is just so perfect, and then when you combine it with the glazed metallic sheen…well, you have a fabric that’s to die for. Lightweight and softly pliable. Perfect for tops, dresses, unconstructed jackets and more.

Seriously, how could I resist?

The fabric didn’t disappoint ~ actually I want more!

Slippery, you think? Nope.

Flimsy, you suspect? Nope.

The backing on the fabric produces the perfect texture for machine sewing.

I’m devoted to sewing holiday attire for the next few weeks and couldn’t pass up the giant bow on Butterick 5850!

www.goodbyevalentino.com  Butterick 5850 silk/viscose blend - Mood Fabrics

The silk/viscose worked beautifully with the pattern in every aspect. The gathered skirt is attached to a fitted back.

IMG_3060

 I typically shy away from gathered waistlines, but I wanted that bow! The sash cinches the waist, helping camouflage the bulk that gathers can produce, and I found the fitted back flattering.

www.goodbyevalentino.com  Butterick 5850 silk/viscose blend - Mood FabricsI was forced to move the photos to indoor light. Look at the difference.

www.goodbyevalentino.com  Butterick 5850 silk/viscose blend - Mood Fabrics  IMG_2987
However, I sacrificed the high resolution in order the capture the sheen of the fabric. 

 Fitting issues plagued my sewing which I’ll review in detail on the Pattern Review website. In short they included the enormous armscye. I removed three inches from each arm which affected the dart……. The shoulders are not cut in as they appear on the pattern illustration.

B5850 illustration The effect is created by the pleat at the back of the neck. The ties are designed as a single layer with the wrong side showing when bowed. I folded the fabric in half, sewed right sides together and turned to avoid the showing the wrong side. I also removed 10 inches from the length of each tie. Being left-handed I placed the zipper on left side rather than the right – one of the joys of sewing!

At any rate, I made the pattern work and am ready for the first holiday party or maybe the last on New Year’s Eve ;)

IMG_3075

 Except…….. I think this dress needs a fur.

Faux fur sewing tips, anyone?

Until soon :)


Marfy + Mood = Love

$
0
0

Have you made your Marfy yet?

Thanks to Leisa Stanton of A Challenging Sew, I had no more excuses to avoid the chic Italian patterns without instructions. Not only are three free patterns available for downloads on the Marfy website, but Leisa is providing sew-a-longs for the patterns on her blog and just completed the top sew-a-long.

How do you like it?

IMG_4008

 The pattern is Marfy 1913, and after two muslins I was ready to cut my Thakoon silk crepe de chine from Mood Fabrics. When the silk arrived in July, I was tempted to make my 5th sleeveless ruffled top.

No! No! No!” exclaimed the sewing angels :)

 I contemplated a shirt dress and the next thing I knew it was November…….

I fell hard for this pattern with its cut-in shoulders and soft drape.

1913_2_blu

I knew the style was suitable for everyday or special occasion dressing, plus I could wear it tucked in or left out.

IMG_4045 Leisa’s sew-a-long removes the mystery from the Marfy. She allows two weeks to complete a Marfy pattern, and her virtual patience set me in to a slower than normal sewing pace. I forbade myself from rushing through any aspect of constructing the top.

The top is easy to sew, but understanding what to do took some time.

Briefly:

  • I printed the pattern on 13 sheets of paper and experienced a disaster. The pattern did not print to scale and my adjustments were incorrect. Muslin #1 resembled a child’s garment, but after regrouping and reprinting I was back on track.
  • From my second muslin I quickly made a shell to check for fit using an inexpensive polyester.
  • While some sewing details are noted on the paper pattern, others are completely missing. For instance, there was no marking to indicate where to place the back opening. Leisa suggested different options and provided a detailed tutorial for one method carefully gauging the appropriate opening size. The slash is finished with a small dart – a completely new technique for me.

IMG_4122

  • I secured the closure with two buttons and loop buttonholes using a chain stitch. Leisa used a small leather buckle, but a zipper can be inserted as well. I guess this is part of the beauty of sewing Marfy patterns.
  • In addition to Leisa’s excellent instructions, links to many fine tutorials are provided throughout the six part sew-a-long, and no detail is overlooked.
  • I opted out of the elastic band on the lower edge of the top,  and removed one inch of ease from the side seams allowing the blouse to easily tuck in fitted clothes.

IMG_4110 (1)

It’s nice to be finished and even better to have a permanent muslin and pattern for this top!

IMG_4064

Using such little fabric I can justify splurging next time around. I can just see it in these Carolina Herrera and Oscar de la Renta prints, not to mention luxury silk solids or cotton voile!

Many thanks to Leisa for getting me out of my comfort zone and a huge thank you to Mood for carrying such an array of enticing fabrics!

Until soon :)

New Look 6910

$
0
0

It’s the time…. of the season…. when love runs high……

That means all things wedding around here. With two twenty-something daughters, the fun never stops as someone is always getting engaged or married. Three years ago the wedding season caught me off guard and I spent a fortune outfitting everyone for wedding related occasions. Now, I’m always in the Mood for a wedding.

Sewing has given me access to the world’s greatest designers in an entirely new dimension, especially when sewing with fabric from Mood!

IMG_4389I’m wearing Carolina Herrera to the next wedding :) (check out Mood’s Carolina Herrera fabrics here)

I love Carolina Herrera so much I created a Carolina Herrera Moodboard on the Mood Fabrics website for reference. The only problem is these beauties don’t last long!

My pattern is New Look 6910

6910

I bought the pattern in hopes of making View A or D, and even went to the trouble of making a muslin,

IMG_4304

 but the beautiful Carolina Herrera silk brocade was intended for structured clothing rather than draping or pleating.

IMG_4373As much as I wanted a slightly longer and fuller skirt, the fabric spoke loud and clear, leading me to sew a combination of Views B and C.

 Keeping in style with the fabric, I embellished the belt with a rhinestone buckle in lieu of the self-fabric flower, then hand-stitched the belt to the dress before inserting the zipper.

IMG_4379

 Though the pattern instructions call for lining only the upper bodice, I lined the complete dress with this gold China Silk from Mood. While other options for lining exist, the silk tolerates the hot iron very nicely, not to mention how nice it feels on the skin.

IMG_4370

I made two muslins to get the fit I wanted in the upper bodice,

IMG_4457

Time consuming – yes, but stay tuned……. Now that I have the perfect muslin for all of the pattern variations I intend to make it worth my while since so much love is in the air!

IMG_4387Until soon :)

Don We Now Our Gay Apparel!

$
0
0

Some fabrics are meant to be worn at night, and I believe this shimmery metallic boucle from Mood Fabrics is certainly one of them.

photo-20 I bought the fabric at the NYC store in November 2012, and admired it at home for over a year while waiting for a vision to appear. Perhaps, a coat, a suit, or another French jacket……

And then -  it came upon a midnight clear ;)

IMG_3432

After nearly three weeks of no sewing I was eager to make something festive and chose the classic Butterick 5588 pattern as my base (available on Etsy).

Butterick 5588

Since the fabric is relatively heavy I wanted to avoid bulky darts as well as fullness and believed the princess seams would compliment the fabric. I completed a full muslin in View B before cutting the shoulders off of the front, gradually angling to the underarm.

IMG_3431

I used the lower edge of the side back as my guide and cut straight across the back.

IMG_3468

 After tweaking the fit until the dress was tight enough to wear strapless, I added 1 ¼” straps to increase the comfort level.

Would you believe I looked for a complimentary trim for over a year?

Nothing seemed to pop to my novice eye, but last week while browsing through the winter wonderland of festive clothes at Nordstrom, I noticed the Alice + Oliva Boxman jacket seen below…

_8407520 … and realized I had my own trim waiting at home.

IMG_3409 IMG_3410

Pulling the neutral-color threads from a 1 ¾” strip of fabric resulted in a metallic fringe. After the dress was completed, I attached the fringe by hand around the top of the bodice. I was tempted to add it to the straps and around the bottom, but thankfully good judgment prevailed.

My new party dress is lined with this China silk also purchased at Mood .

IMG_3413It’s true, the fabric is lovely during the day …..

IMG_3454but it truly comes to life when the sun goes down!

gold dress

If only I could do the same!

Fa-la-la-la-la-la-la-la-la :)

Vogue 8532

$
0
0

Santa Baby,

Leave a sable underneath the tree for me……  :)

While waiting for Santa, I sewed one more holiday dress, this one for a January wedding.

IMG_3434

I have never seen a Carolina Herrera I didn’t love which includes this cobalt blue paisley silk brocade from Mood Fabrics.

Yum……. I was sold on the color alone until the fabric arrived. The quality of this brocade is unlike any I have seen or touched. It’s that good, and once again I found myself scared to cut my fabric.

What would Carolina do?

Santa baby……. give me an answer!

IMG_3534

 I made a muslin from an old Vogue pattern –  8532, now available on Etsy and Ebay.

8532

Then, an amazing thing happened. It fit perfectly with only a minimal length adjustment in the bodice!

IMG_3479

No sliding off of the shoulder, no gaping neckline.

I believe! I believe!

Fortunately I was able to fast forward sewing the dress after making the muslin. I lined it with perfectly matching Bemberg rayon lining,

IMG_3563

and veered into the pop scene with a metal zipper.

IMG_3515

One tip I must share came from the recent Craftsy class I bought,

40 Techniques Every Sewer Should Know – Gail Yellen

I learned how to remove excess ease from a sleeve cap in a matter of seconds. Typically the perfect amount of ease is approximately 1 ¼ – 1 ½ “.  Gail Yellen explains how to measure for and removed excessive ease from a sleeve cap by

1: measuring the distance between the single and double notch on the sleeve and  in the armscye.

image
2: If the difference is greater than 1 ½ “, simply skim off the top of the sleeve.

   image  image
That’s it.

And now all is calm, all is bright.

IMG_3435

Merry Christmas to all and to all a good night :)

Disclosure:  Recently I became a Craftsy affiliate and receive compensation when you purchase classes or join Craftsy. I agreed to  become a Craftsy affiliate after several successful Craftsy experiences. With the exception of Sew the Perfect Fit, I have purchased all Craftsy classes and provide an honest class review and opinion.The compensation received will never influence the content of this blog.


Save the Silk!

$
0
0

Shame, Shame, Shame!

The only thing that saved my latest from being a wadder is the beautiful crepe de chine from Mood Fabrics.

It’s all I can do to smile.

The search for the perfect tunic pattern is taking a hiatus. I outsmarted myself by combining pattern pieces from my favorite tunic patterns, including Butterick 4856 Simplicity 4149 and Simplicity 1461.

IMG_0050

I liked the bodice of Butterick 4856, the two-piece back of  Simplicity 1461 and the placket of Simplicity 4149. After coordinating the measurements from the different patterns I assumed all was safe but I met near disaster at almost every juncture :(

IMG_0032

Saving the silk was the only reason to keep going.

The navy trim is an ivory silk twill ordered from Mood over 18 months ago, which I dyed with Navy Rit Dye.

I won’t dwell on what went wrong since it was everything, but I managed to struggle though the issues until I completed a tunic.

IMG_0056

I share my near disastrous project with readers because when I started sewing again, I vowed to always complete my garments.

I’m glad I did for the top will serve as a reminder not to do this again, but I hope I can wear it without focusing on the shortcomings.

IMG_0064

Searching for the perfect tunic in fit and design has led me to the conclusion that I need to learn  to design patterns. I can envision what I’m looking for but have been unable to make it happen. To prevent further disasters  I’ve enrolled in a  Craftsy Course, Patternmaking Basics: The Bodice Sloper with Suzy Furrer. I look forward to sharing what I learn with you.

More soon :)

Scuby Dooby Doo & Giveaway Winner!

$
0
0

Although sewing Halloween costumes are but fond memories these days,  I could not resist the vivid holiday colors in this Scuba Knit ordered from B & J Fabrics.

IMG_0063

What does the dress really look like under the 20-year old Eileen Fisher cardigan, you wonder?

Here is the front,

IMG_0047

and here is the back ;)

IMG_0024

What a fun dress this was to sew!

If you have never sewn with Scuba Knit I encourage you to try it. Many scuba knits feature high-resolution digital printing almost resembling photographs. It is nearly impossible to make a garment too tight when sewing with this fabric  - scuba knit is easy to handle, and at the moment, it  is the fabric of choice for many clothing manufacturers.

IMG_0025

The pattern is McCall’s 6920; a current company pattern and a new pattern for me.

M6920 M6920 line

The black contrast is a fine multi-purpose polyester knit I purchased at Mood Fabrics in November 2013. I bought lots of it and predict it will be showing up with regularity. Once again I followed Sunni Standing’s excellent instructions in the free Craftsy Mastering Zipper Techniques Class.

IMG_0023

After making my usual bodice adjustments in length, I took readers’ advice to heart and made it fitted :)

IMG_0033

 but it is anything other than a ‘stand up only’ dress thanks to the stretch!

 IMG_0032

 I’ve tried to stick to sewing all-purpose clothes this fall and find dresses so much easier to sew than tops. Why is that?

IMG_0053

Whatever the reason, I’m happy to have a dress that will serve me well through Thanksgiving!

____________________

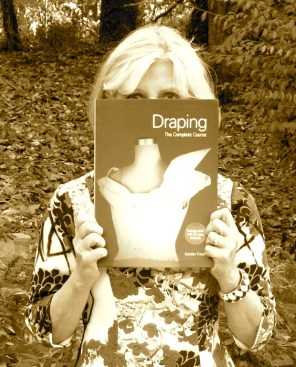
And now, the lucky giveaway winner of Karolyn Kiisel’s fabulous Draping Book. IMG_0102

C o n g r a t u l a t i o n s   to

ELEANOR SCHREYER

Please contact me by Monday November 3, at goodbyevalentino@gmail.com or another winner will be selected.

Best wishes to all for a fun-filled and safe Halloween :)

B O O !


Supersize Me!

$
0
0


Maybe it’s just me but on January 2, I was craving an oversized shirt to hide my holiday indulgences…. and when I’m in an unattractive state of mind, the  fabric I like to turn to is silk.

This Famous Designer Black and Off-White Animal Print Crepe de Chine was the perfect antidote for my post holiday doldrums.

Crepe de Chine

 I feel better already!

IMG_0190

My pattern of choice was Simplicity 2447, but it wasn’t just oversized, it was supersized!

Simplicity 2447

 Before cutting into the silk I made a full muslin which required one alteration after another. The photo below shows the muslin after the excess is pinned out of the princess seams and (the photo left) armscye.

IMG_0056

It’s not easy being short ;) Check out the bunching of fabric in the back after I removed two inches of length from the bodice……..

IMG_0064

To eliminate the excess from the muslin I followed Lynda Maynard’s directions from her Craftsy Class, Sew the Perfect Fit by horizontally slicing the back pattern piece at the waist to the edge of the paper. By creating a wedge I eliminated the bulk from the middle of the back without affecting the length. Fortunately, my new roll of Pattern Paper from Mood Fabrics served me well as I transferred my alterations to a new pattern piece.

Simp 2447

It helped re-draw the pattern on grain and assisted in keeping my alterations precise as I drafted a new pattern piece from the alterations.  For those making constant pattern alterations, I believe the huge roll of paper is worth the $30 investment Check it out HERE.

pattern paper

After eliminating the bulk from the back, I left the back length longer than the front.

IMG_0014 2

My one regret was not ordering an extra ½ yard of the silk. I did not have enough fabric for a full collar and settled on the collar stand featured in View D.

I cut all pattern pieces with a new rotary blade and used pattern weights (along with a very few pins) to prevent slipping.  All of the careful measuring, pinning and fitting were worth the time, as I believe oversized garments should fit just as well as fitted ones.

001 facebook_cover (1)Sewing a casual style in silk crepe de chine was true luxury for me. Whether worn with an old pair or cords or my new Marcy Tilton leggings, the combination of style and fabric yields a top that is the epitome of comfort and a great wardrobe extender.

IMG_0040

Hubby hasn’t seen it yet but I know what his reaction will be……..

“ It’s pretty, but I like fitted clothes and shirts that tuck in better.”

 Presto!

IMG_0014

 Gotta love the versatility of a silk blouse !

Until soon :)

Vogue 9022

$
0
0

How many times have you seen a ready-to-wear garment that you KNEW you could make… if only you had the pattern?

akris punto dressThat was certainly my reaction upon seeing this Akris Punto dress, and when I noticed some similarities in Vogue 9022 to the $995.00 dress, I couldn’t resist. True, the pattern is split vertically rather than horizontally, but I was feeling adventurous, and besides, I loved the pockets.


V9022

V9022 line

How did I do?

IMG_0106

What I really like about the Akris Punto dress is its unstructured but not too oversized nature. I have avoided kimono sleeves because they appear so large, however, Vogue describes this pattern as fitted.

After making the muslin I sewed the dress one size smaller (X-Small). A little tweaking on the sleeves and an adjustment in the back seam gave me the fit I was seeking.

IMG_0126 IMG_0185

The fabric content of the Akris Punto dress is 52% acetate 48% viscose. My dress is sewn in lightweight wool crepe ordered from Mood Fabrics last year. It is unlined and does not wrinkle or itch. I also used the same fabric in this skirt last year.

I took my daughter’s advice to eliminate the back vent, split the side seams and leave the back longer keeping the dress on trend. ;)

IMG_0130

To color block the sleeves, I traced the upper front and back pattern pieces to pattern paper. Starting at the bottom of the sleeve I split the pattern piece in half  but eventually eyeballed it once I came to the underarm curve. How scientific is that?

Afterwards, I added a seam allowance to the new pattern pieces and was quite relieved when all of the pieces matched up in the muslin! If I try this again, I plan to eliminate the upper front seams.

IMG_0207

Many thanks to Akris Punto for inspiring me to try a new style, for I would have overlooked the cute Vogue pattern otherwise.

I’m so pleased with the result that I splurged on a new pair shoes but sadly I’m not as warm as I look. I’ll be wearing my dress with black tights and boots for the next several weeks while sewing with warm sunny thoughts in mind!

IMG_0183

Until soon :)


Hot Pink Boucle!

$
0
0


How  do you like our six inches of snow?

IMG_0056
We get ridiculously excited about every winter storm warning in the South, wipe out the grocery stores and cancel events in anticipation of snow. This ‘winter storm’ I hit the sewing machine with a color hot enough to melt the ice off the patio.

When the skies turned gray my eye turned to this bright pink boucle on the Mood Fabrics website. It is soft, it is happy and it is well-behaved :)

IMG_0042

My pattern is Vogue 9022  sewn last month in a color block style with Mood’s black and white wool crepe. This time I sewed the pattern straight up; a much easier undertaking. I took extra precaution to prevent raveling and stretching by rushing to the sewing machine after cutting each piece to stay-stitch curved edges, followed by finishing all of the edges on every pattern piece on the serger.

Boucle finished edge

I discovered the enjoyment of creating boucle fringe (blogged here) and couldn’t resist embellishing the pockets and cuffs with self fringe. It’s a breeze to make by cutting strips on the cross grain, stay- stitching 1/2 inch from the edge and raveling to the stay stitch.

I made a double fringe trim for the pockets which I applied with a topstitch before sewing the side seams together. The sleeves are trimmed with a single fringe which was sewn right side down to the sleeve then flipped over and top stitched.

    sleeve    unnamed

Speaking of topstitching, I find boucle is one of the easiest fabrics to topstitch! In addition to the fringe I topstitched the two front center seams and around the neckline.

IMG_0018

The jeweled pocket buttons are recycled from an old Talbots’ sweater.

IMG_0007

The boucle has a lovely drape, and is quickly rising on my list of favorite fabrics! With the exception of being prone to raveling, the fabric is perfect.

IMG_0011So here’s to boucle (not just for French Jackets), embellishing easy patterns and fast melting snow!

IMG_0016

Stay warm :)

DVF Cotton Lace Skirt

$
0
0

Just a skirt?…… Not to me!

When the DVF floral bordered cotton lace arrived on my doorstep last Spring from Mood Fabrics, I knew it deserved the royal treatment, but I didn’t expect this special fabric to be in queue for nearly a year.

IMG_0041

Greetings from Scottsdale, Arizona, the new hometown of my daughter and son-in-law.  It’s only 2,019 miles away from South Carolina. ;)

IMG_0008

I once heard Susan Khalje say that she could keep someone busy for an entire week sewing a pencil skirt. Now, I know what she means, for I spent one week making my couture pencil skirt. The skirt consists of 4 layers – the lace, cotton oxford, silk organza and bemberg rayon lining.

I cut the fabric on the crosswise grain to take advantage of the scalloped border. Then I spent a day securing the oxford to the lace so it would behave as one piece of fabric. In the beginning I knotted and clipped my thread after each stitch, but found that simply knotting was enough.

IMG_1983The silk organza became layer number 3, which was basted to the lace and oxford cloth. In couture sewing the seam line is traced onto every pattern piece and seam allowances are generous. Since this is my 5th Katie Spade skirt to sew, I was tempted to skip this step and cut a 5/8″ allowance. Now I am thankful I followed the rule as all of the layering can affect the fabric edges and throw off the entire fit of the garment.

The pattern, modeled after the Kate Spade Judy skirt is truly my favorite skirt to sew with no front darts and beautiful shaping along the side seams. The waistband sits at the waist and is not only comfortable but perfect for those rare tuck-in occasions. I may move the zipper to side the next time around.

IMG_0026 IMG_0016  IMG_0036
Sadly, this lace is no longer available, but here is a link to Mood Fabrics’  lace. The oxford cloth was from my stash, and the whisper white silk organza and bemberg rayon linings are readily available from Mood.

I intended to make a two piece dress for my daughter’s Bridesmaids’ Luncheon last August using the vintage McCall’s pattern 8500. While the event has changed my pattern intentions have not, and I hope to be back soon with the second half of my outfit and an entirely different look!

IMG_0030


Best wishes :)


DVF Lace Part II

$
0
0

001 facebook_cover (1)

What a difference a top makes!

IMG_0076

Some people are born to sew couture. It relaxes them they say……

I get that, but before undertaking a couture garment, I always take a deep breath and try to prepare myself for the time commitment couture sewing requires. To date, I have underestimated the time commitment of every project.

But now it’s time to celebrate!

As mentioned in the previous DVF skirt post,  I ordered the lilac cotton lace from Mood Fabrics last Spring, envisioning a two-piece dress for my daughter’s Bridesmaids’ luncheon on August 22, 2014.  I even took the fabric to Susan Khalje’s class in Baltimore last April with the vintage McCalls pattern, but I could not pass up the opportunity to sew with Valentino satin face chiffon under Susan’s guidance.

All was not lost or wasted – just delayed 365 days ;)

IMG_0093

Frankly, I wouldn’t have known how to go about sewing the top (or skirt) were it not for investing in two previous Susan Khalje classes. I needed both  for Susan’s instruction and the inspiration provided by my classmates.

IMG_0079

Just like the skirt  blogged here, the top consists of four layers of fabric which include the heavy cotton lace, oxford cloth, silk organza and Bemberg rayon lining.  Some readers questioned the weight of oxford cloth as an underlining. It worked out great for the skirt, but I sought the advice from friends with lots of couture sewing experience before proceeding with the vintage McCall’s 8500 pattern.

2e242e4832eddd6560d6c183bdae14c7

Vintage patterns are an excellent for couture projects since the patterns have marked seam lines; the main ingredient in couture sewing. To no surprise I made several alterations marked in blue on the muslin

unnamed

I considered sewing a princess seam pattern because I feared the pattern’s eight darts would be bulky with the layering. Splitting the two bust darts and catch-stitching the waist and back darts to the organza easily solved the problem.

In the photo below you can see:

  • the long vertical dart catch-stitched to the organza
  • the stitches used to secure the lace to the oxford cloth before the organza is applied
  • a pink vertical basting stitch to ensure no slipping
  • lastly, the edge of the organza and the oxford cloth and zigzagged together since the scallop edge of the lace serves as the hem

unnamed

Eliminating the two top back darts and replacing them with dead darts  made for a smoother back.

IMG_0034

The three horizontal lines in  photo below illustrates the three alterations I made to remove excess bulk.

unnamed

The zipper is concealed in the side seam. The pattern provides a facing for the neck and arms, but I sewed a full lining. The DVF lace is no longer available at Mood, but I believe a heavy lace such as this guipure lace would sew similarly.

IMG_0009

So there you have it….. eight months too late for the Bridesmaids’ luncheon but just in time for a new wedding season :)

IMG_0083

Until Soon :)


Vogue 8950

$
0
0

Had I planned to be gone for over two weeks I would have announced a short leave of absence. I’ve been sewing like crazy on non-blog related projects, one of which involved sewing red cheerleading skirts for grown men participating in a Cancer Association fundraiser – thankfully it was a great success ;)

I’m happy to be back and am in the midst of some stash busting. This project, inspired by the hundreds of shapeless tops I see online and in the stores was an immediate gratification project, and one I hope to fine tune next time around.

IMG_0114

The pattern Vogue 8950 was completed from start to finish yesterday afternoon.

V8950

V8950 sketch

I skipped out on making a muslin, and although my top very much resembles the sketch, I did not achieve the ‘semi-fitted’ fit found in the pattern description.

IMG_0090 2

I combined the remnant of a black mystery knit purchased at Mood Fabrics (sewn many times before), with a flexible black cotton eyelet also purchased from Mood.

IMG_0110I doubt either of these fabrics are still available, but in my opinion a better choice for the top would be one of Mood’s fantastic mesh fabrics offered in several colors and designs, my favorite being the Wonder Mesh – I want some!

Many aspects of the pattern worked well for this project. The neckline is finished with a narrow hem which is a perfect technique for the eyelet, and the high/low hemline provided a visual balance for the loose fit. My only change to the pattern was converting the two-piece long sleeve into a single piece.

IMG_0121This basic pattern is truly a keeper with loads of possibilities – check out one of my inspiration sites here on the Sak’s page! I know I’m going to love the top – not only is it cool, but the sleeves are mosquito proof – reason enough to give that Power Mesh a try!

IMG_0165

Back to more Summer Stash Busting!

Be back soon :)

Neoprene Delight!

$
0
0

How’s this for a One Yard Wonder?

IMG_0078It’s true – I made this dress with one yard of Mood Fabric’s Watercolor Clouds Digitally Printed Stretch Neoprene. There’s more where this came from too. Check it out here. I want the one with the lips if some cool blogger like Oonaballoona or Sallieoh doesn’t beat me to it ;)

Seriously, this is the best knit fabric ever……

IMG_0001It’s perfect for a fitted dress. I’m not even sure this is my shape, but it’s the shape of my pattern and the neoprene follows orders beautifully!

My pattern is Vogue 9047, another wonderful discovery with its flattering raised waistline. Other than adjusting the length in the bodice I made zero fitting alterations, and best of all, this pattern is a blank canvas just waiting to come to life! I look forward to creating variations on this well-drafted beauty.

Since my fabric spoke volumes, I omitted the optional tabs seen in the sketch and kept it simple. The pattern requires lots of narrow hems and topstitching which went smoothly after I switched to a STRETCH needle.

IMG_0036Steam-a-Seam stabilized the curved edges in the neck and arms but the topstitching the the hem and along the upper bodice sewed easily on its own.

Two tips to pass along when sewing with neoprene: Keep a silk organza press cloth handy and use a smooth (as opposed to perforated) tracing wheel.

IMG_0047I simply love a dress that can transport me from one occasion to another!

IMG_0088

Fortunately this one can be dressed up or down and travels beautifully – never a wrinkle anywhere or anytime :)
IMG_0006
Can you endure anymore of my gushing? Rest assured, it’s all sincere for I just adore this relatively new fabric dominating the RTW scene, and hope to sew with again many times.
IMG_0090

Until soon!


ADDENDUM!

For those interested in the difference between neoprene and scuba knit, read Neucarol’s blog post @ http://www.neucarol.com/blog/is-it-neoprene-or-scuba-knit-should-i-care/ for a thorough explanation. ;)

Let It Be ?

$
0
0


If asked, I would name this fabric jazz.

IMG_0060

It’s spontaneous but unified, improvisational yet clearly designed. I see a colorful keyboard.

IMG_0062

But there is a problem.

IMG_0057Can this free spirited cotton voile be transformed into a singular sensation?

IMG_0070Will its unique voice be heard once it’s cut and sewn?

IMG_0060

Tell me, dear Readers……. what would you do? Would you sew it or let it be?

IMG_0098

…. and what would you make?

IMG_0076

A Lizard, Newspaper, Craftsy and Silk

$
0
0

Maybe you read Pamela Druckerman’s New York Times Op Ed on Sunday. It’s a synopsis of the commencement speech she gave to students graduating from the Paris College of Art, an American art and design school in France. By the time I reached the end of the column I felt it was written just for sewists and sewing bloggers - especially the paragraph that states it’s ok to be obsessive.

Druckerman quotes comedian Louis C.K. who says “Anything you do should be better than anything you did before.” That statement might have been a joke, but …… um……. when it comes to sewing I’m always expecting a better result that the previous project.

IMG_0017

My last project blogged here left room for improvement. Vogue 9109 is a wonderfully easy pattern, but sewing with silk is a different story. I was long overdue to watch my Craftsy class Sewing with Silks: The Liberty Shirt purchased earlier in the year. Taught by Linda Lee, the instructions revolve primarily around sewing the pattern provided with the purchase of the class.

I decided to apply her instructions to the Very Easy Vogue 9109 pattern. I wanted to remake the pattern and I wanted it to be better than the one before ;) . Because the Liberty Shirt is far more involved than my pattern I did not watch the entire class, however Linda provides many practical tips for sewing with silk.

IMG_0032

For starters, she suggests washing your silk before sewing, primarily because it makes it much easier to spot clean. Had I only known that helpful fact when I made the pink silk top which I ruined before wearing while trying to spot clean!

She teaches how to straighten the grain by pulling a cross thread. The pics below show the process and the result.

IMG_0001       IMG_0003

Linda teaches how to cut with a rotary, mark with tailor tacs, the best stitch length for different silks, hem finishes, pressing methods, plus much more…… and my new garment is better indeed.

It’s true – another blue garment, but I took the little porch lizard’s bright blue tail as a signal to go ahead and sew the Italian ‘Surf the Web’ Blue Crepe de Chine from Mood Fabrics.

IMG_0002

This time I sewed the pattern as it was originally designed and made a top.

IMG_0011

I do not have my serger at the beach, and sewed the top using French Seams which is also covered in the Craftsy class. I chose to hem the top with a narrow machine hem which I find works very well on silk.  Since  this was my second time to sew the pattern, fitting was not an issue allowing me to concentrate on technique.

IMG_0020

As someone who is partial to patterned fabric, I find sewing with solids tricky and rather unforgiving! I basted every seam and sewed  s l o w l y. I love the result of this well-cut pattern! It’s full enough to catch a breeze as seen below, but otherwise drapes into a flattering fit. The cut of the shoulders is just right :)

IMG_0010I never imagined the New York Times, Linda Lee, Mood Fabrics and a lizard appearing in one post, but as Pamela Druckerman mentions, everything is potential inspiration………..  “One of the great joys of a creative life is that your observations and loose moments aren’t lost forever; they live in your work.”

Until soon.

IMG_0036 2


Style Arc Teena Dress

$
0
0

Do you know that the one color you should never wear for a job interview is…….

IMG_0094

This is no office dress – rather one ready for those hot summer nights and ‘dressy casual’ occasions!

Greetings from the home front :)
My pattern is the Style Arc Teena Dress , a pattern I bought last summer in consideration for my mother of the bride dress.

teena dressHad I made a muslin last summer I would have known that the pattern would have worked beautifully as a long dress for the occasion.

I’ve been a Style Arc fan since sewing my first pattern over 3 years ago. The patterns fit beautifully even if they aren’t especially user friendly.

IMG_0126

What I truly love about the Teena Dress are the two-piece side panels seen in the illustration above and the photo below. The front side and back side panels are split horizontally enabling a superior fit through the bodice. It’s difficult to determine the seam lines due to the fabric design, but a click or two on the photograph below will show you the details.

Style Arc-001

Two fabrics are used for the dress. The top layer is an Italian red coral cotton eyelet from Mood Fabrics, but the structure of the dress and the depth of color are provided from the lining. Labeled a hibiscus cotton batiste (no longer available) on the Mood website – it is more like a cotton poplin with stretch! I never intended to use the two fabrics together, more like they found each other in the stash ;)

image

Style Arc patterns are shipped from Australia, sold in single sizes, use a 3/8 ” seam and offer sparse instructions. However, the sizes are accurate and the website provides a page of sewing tutorials, tips and construction features for techniques found in the patterns.

Sadly, I was unable to find an invisible zipper to match the fabric, but the slotted zipper worked nicely. I made two slight design changes in raising the back 1 inch and increasing the strap width from 1/4″ to 3/4″.

IMG_0150

Though the pattern calls for boning only on the strapless version, I added two pieces of 6″ spiral steel boning to the upper bodice sides. I could not insert the boning into the 3/8″ seams which led to making a casing for the boning and stitching it to the wrong side of the lining. Once the lining was sewn and turned it’s practically invisible.

image

image

image

One of the things I love most about sewing is the constant state of flexibility I’ve developed through my beloved hobby. The pattern was not used as intended, the batiste was not what I expected, and yet one year later the stars aligned and a new dress was created.

Who knows what will be next!

IMG_0132

Until soon :)


Viewing all 118 articles
Browse latest View live